This is default featured slide 1 title

Go to Blogger edit html and find these sentences.Now replace these sentences with your own descriptions.This theme is Bloggerized by Lasantha Bandara - Premiumbloggertemplates.com.

This is default featured slide 2 title

Go to Blogger edit html and find these sentences.Now replace these sentences with your own descriptions.This theme is Bloggerized by Lasantha Bandara - Premiumbloggertemplates.com.

This is default featured slide 3 title

Go to Blogger edit html and find these sentences.Now replace these sentences with your own descriptions.This theme is Bloggerized by Lasantha Bandara - Premiumbloggertemplates.com.

This is default featured slide 4 title

Go to Blogger edit html and find these sentences.Now replace these sentences with your own descriptions.This theme is Bloggerized by Lasantha Bandara - Premiumbloggertemplates.com.

This is default featured slide 5 title

Go to Blogger edit html and find these sentences.Now replace these sentences with your own descriptions.This theme is Bloggerized by Lasantha Bandara - Premiumbloggertemplates.com.

Tampilkan postingan dengan label Tutorial. Tampilkan semua postingan

Jumat, 06 September 2013

Mengubah layout di Eclipse android

Kali ini saya akan berbagi cara mengubah layout eclipse android

 pertama tulis kode berikut di activity

 import android.view.View;

dan

    public void changelayout1(View view) {
        setContentView(R.layout.activity_main);
    }
}

kemudian dibawah <Button ditambah

android:onClick="changelayout1"

(tulisan merah dapat diganti - ganti tapi harus sama)

Kamis, 05 September 2013

Mengubah swf ke apk dengan eclipse

Setelah lama mencari diinternet akhirnya aku menemukan cara mengubah swf ke apk.tapi belum kucoba karena eclipse ku error.
pertama harus impor file swf ke asset dan kemudian langsung saja ini kodenya


importandroid.app.Activity;
import android.os.Bundle;
import android.webkit.WebView;

public class MainActivity extends Activity {
    /** Called when the activity is first created. */
    @Override
    public void onCreate(Bundle savedInstanceState) {
        super.onCreate(savedInstanceState);
        setContentView(R.layout.main);
       
       
        String url ="file:///android_asset/namaswf.swf";                          
        WebViewwv=(WebView) findViewById(R.id.web_engine);
        wv.getSettings().setPluginsEnabled(true);
        wv.loadUrl(url);       
    }
}


Ini kode XMLnya


<?xml version="1.0" encoding="utf-8"?>
<AbsoluteLayoutxmlns:android="http://schemas.android.com/apk/res/android"
    android:layout_width="fill_parent"
    android:layout_height="fill_parent" >
<WebViewandroid:id="@+id/web_engine"
             android:layout_width="fill_parent"
             android:layout_height="fill_parent">
    
 </WebView>  
</AbsoluteLayout>


Haaapppppyyyyy coding !!!!!!!!!!!!!!

Senin, 18 Maret 2013

Mematikan Perbaharuan Apikasil Otomatis Android

 pulsa tekuras tapi tidak digunakan nelpon dan sms atau kuota berkurang?,bisa jadi salah satu penyebabnya adalah pembaharuan aplikasi otomatis.berikut ini adalah cara mematikannya
1.buka aplikasi google play
2.tekan tombol menu pada hp atau sentuh pojok kanan atas pada tablet
3.sentuh setelan
4.Hilangkan tanda ceklis pada "Perbaharui apl secara otomatis"

Minggu, 10 Maret 2013

Cara Install .Net Framework 3.5 Windows 8 (Offline)

1.siapkan windows 8 lewat CD, Flashdik atau portabel disk (ISO)

2. Jalankan Command Prompt / CMD (Run as Administrator)

cari cmd.exe di /C:/Windows/System32 klik kanan Run as Administrator

3.ketik DISM.exe /Online /enable-feature /featurename:NetFX3 /Source:H:\sources\sxs /LimitAccess

4.ganti huruf merah dengan lokasi drive windows 8

5.tekan enter

6.tunggu proses selesai

Selasa, 09 Oktober 2012

Menginstal .apk Di perangkat android

1.masukkan .apk .ke perangkat android
2.klik .apk
3.klik instal

Jumat, 12 Maret 2010

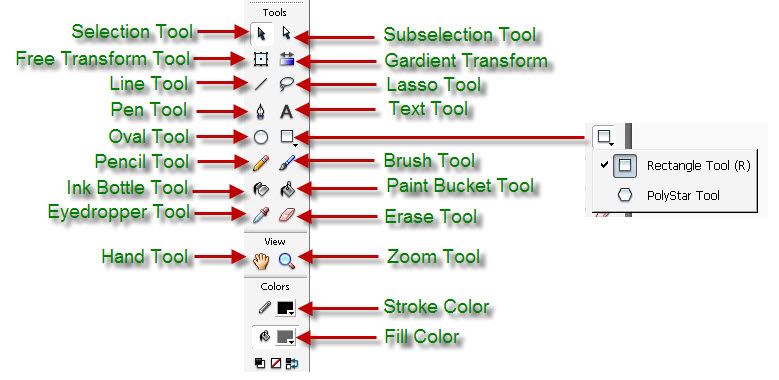
TOOL BOX MACROMEDIA FLASH

Menggambar menggunakan macromedia flash itu mudah lho. Untuk menggambar pada macromedia flash  digunakan tombol yang ada pada Tool box. Dari tool box   dapat dipilih gambar kotak,lingkaran dan sebagainya. Mari kita pahami kegunaan tombol-tombol tersebut.

Selection tool = untuk memodifikasi garis/bentuk warna ,memilih gambar,dan untuk memindah gambar
Sub selection tool = memodifikasi garis/titisudut
Free transform tool = memodifikasi bentuk gambar.
Gradient tool = untuk memodifikasi warna radial dan linear.
Line tool = untuk membuat garis.
Lasso tool = untuk memilih gambar.
Pen tool = untuk membuat garis bergelombang.
Text tool = untuk membuat kata/kalimat.
Oval tool = untuk membuat lingkaran/oval
Retangle tool = untuk membuat persegi/kotak
Polystar tool = untuk membuat segi 6.
Pencil tool = untuk membuat garis.
Brush tool = untuk menggambar warna.
Ink bottle = untuk mewarnai garis.
Paint bucket tool = untuk mewarnai gambar
Eye dropper = untuk menyamakan warna.
Erase tool = untuk menghapus gambar.
Hand tool = untuk memindahkan tempat menggambar.
Zoom tool = untuk mendekatkan/menjauhkan gambar
Stroke color = untuk memilih warna garis
Fill color = untuk memilih warna brush,memilih warna tulisan,mewarnai isi gambar tombol pada keyboard
keyboard shortcut:
selection tool =V
Sub selection tool = A
Free transform tool =.Q
Gradient tool = F
Line tool = N
Lasso tool = L
Pen tool = P
Text tool = T
Oval tool = O
Retangle tool = R
Polystar tool =
Pencil tool = Y
Brush tool = B
Ink bottle = S
Paint bucket tool =K
Eye dropper = I
Erase tool         = E
Hand tool          = H
Zoom tool         = M,Z